Set Up and Manage Registration Payments
Set up Stripe Connect, receive payments, withdraw funds, and handle refunds
To accept paid registrations for your conference, you need to connect a payout method through Stripe Connect. This allows registration payments to flow directly to your bank account.
Before You Start
What you'll need:
- A bank account or debit card in your country
- Government-issued photo ID (driver's license, passport, or state ID)
- Your phone for SMS verification codes
- About 5-10 minutes to complete setup
Important notes:
- You must be in a Stripe-supported country (46+ countries including US, Canada, UK, EU, Australia)
- PO boxes are not accepted for business addresses
- You can use a personal bank account — no business account required
Step-by-Step Setup Guide
Step 1: Navigate to Payments & Payouts
- Go to Conferences in the sidebar, then click on your conference
- Under Registration Management, click "Payments & Payouts"
You'll see the Stripe Account status showing "Not Connected".
Step 2: Start Stripe Connect
- Click the "Connect Stripe" button
- You'll be redirected to Stripe's secure onboarding page
Step 3: Enter Your Email and Phone
- Enter your email address (this becomes your Stripe login)
- Enter your phone number
- Click "Continue"
- Stripe will text you a 6-digit verification code
- Enter the code to verify your identity
Step 4: Select Your Account Type
Choose the option that best describes you:
| Account Type | When to Use |
|---|---|
| Individual | You're collecting payments personally (easiest option for most chairs) |
| Company | You have a registered business entity |
| Nonprofit Organization | Payments go to a university or registered nonprofit |
Tip: If you're unsure, select Individual. You can still use your personal bank account and receive payments directly.
Step 5: Provide Your Information
Based on your account type, you'll need to provide:
For Individuals:
- Legal name (as it appears on your ID)
- Date of birth
- Last 4 digits of SSN (US) or equivalent national ID
- Home address
For Nonprofits/Companies:
- Legal business name (as it appears on government documents)
- EIN (US) or equivalent tax ID number
- Business address
- Your personal information as the account representative
See Stripe's verification requirements for country-specific details.
Step 6: Verify Your Identity
Stripe requires identity verification to comply with financial regulations:
- Upload a photo of your government-issued ID
- Take a selfie for verification (some cases)
- Wait for automatic verification (usually instant)
Accepted IDs: Driver's license, passport, or state-issued ID card.
Step 7: Connect Your Bank Account
Choose how you want to receive payments:
Option A: Bank Account (Recommended)
- Select your bank from the list, or
- Enter your routing and account number manually
Option B: Debit Card
- Enter your debit card details
- Note: Limited to $9,999 per withdrawal
Step 8: Review and Submit
- Review all your information
- Accept the Stripe Connected Account Agreement
- Click "Submit"
- You'll be redirected back to PaperFox
Your account status should now show Active. You're ready to accept paid registrations!
Account Status Explained
| Status | What It Means | What to Do |
|---|---|---|
| Not Connected | No Stripe account linked | Click "Connect Stripe" to start |
| Pending | Setup started but incomplete | Click "Continue Setup" to finish |
| Active | Ready to accept payments | No action needed |
| Restricted | Verification issues | Click "Complete Verification" or visit Stripe Dashboard to resolve |
Understanding Fees
For each paid registration, fees are automatically deducted:
| Fee | Amount | Description |
|---|---|---|
| Platform Fee | $1.00 | PaperFox service fee per registration |
| Stripe Processing | ~2.9% + $0.30 | Credit card processing fee |
Example: For a $150 registration:
- Stripe fee: $4.65 (2.9% + $0.30)
- Platform fee: $1.00
- You receive: $144.35
International Pricing
Stripe processing fees vary by country. The ~2.9% + $0.30 rate applies to US-based accounts. See Stripe's pricing page for your country's rates.
How Payments Work
When a registrant registers for your conference, here's what happens:
Registrant pays $100
       ↓
   Stripe processes payment
       ↓
┌────────────────────────────────────┐
│ Your Conference's Stripe Balance   │
│ $94.35 available                   │
│ ($100 - $4.65 Stripe - $1 fee)     │
└────────────────────────────────────┘
       ↓
   You click "Withdraw" when ready
       ↓
   Money arrives in your bank (1-2 days)
Key points:
- Money goes to your Stripe balance first, not directly to your bank
- You control when to withdraw funds
- PaperFox charges a $1 platform fee per registration
- Stripe charges ~2.9% + $0.30 processing fee
Withdrawing Your Funds
Once you have funds available:
- Go to Registration Management → Payments & Payouts
- View your Available Balance
- Click "Withdraw to Bank"
- Enter the amount (or click "Max" to withdraw everything)
- Confirm the payout
Timeline: Funds typically arrive in your bank account within 2-3 business days.
Keep a Buffer for Refunds
If you withdraw everything and need to issue a refund later, Stripe will automatically debit your bank account to cover it.
Managing Your Stripe Account
To update your bank account, identity information, or view detailed transaction history:
- Go to Registration Management → Payments & Payouts
- Click "Stripe Dashboard" in the Receive Registration Payments card
- You'll be redirected to the Stripe Express Dashboard
In the Stripe Dashboard you can:
- Change your bank account or debit card
- Update your business or personal information
- View detailed transaction and payout history
- Download tax documents (1099 forms for US accounts)
You may need to verify your identity again when making changes.
Frequently Asked Questions
Do I need a business bank account? No. You can use your personal bank account to receive payments.
Can I use my university's bank account? Yes, if you have authorization. Select "Nonprofit Organization" during setup and provide the university's EIN (or equivalent tax ID).
How long until I can accept payments? Most accounts are verified instantly. In some cases, additional review may take 1-2 business days.
What if I don't have an EIN? Select "Individual" as your account type. You'll use your SSN (or equivalent national ID) instead.
Can I change my bank account later? Yes, through the Stripe Dashboard accessible from the Stripe Dashboard button on the Payments & Payouts page.
Is my information secure? Yes. All financial data is handled by Stripe, which is PCI-DSS compliant. PaperFox never sees your full bank account number or SSN.
What countries are supported? Stripe Connect is available in 46+ countries including the United States, Canada, United Kingdom, Australia, and most of Europe. See Stripe's global availability for the complete list.
Ca registrants get an invoice for reimbursement? Registrants receive a Stripe receipt automatically. If a registrant's finance department needs a formal invoice (common for VAT jurisdictions), see Issuing Invoices for Registrants below.
Handling Refunds
When a registrant requests a refund, you'll receive a notification and can approve or reject it from the Refund Management page. The administrative fee deducted from each refund is set once in your Registration Types setup — see Refund Policy — so you don't re-enter it for every refund, and registrants see the same fee you've set when they request the refund.
Issuing a Refund
-
Go to Registration Management → Refund Management
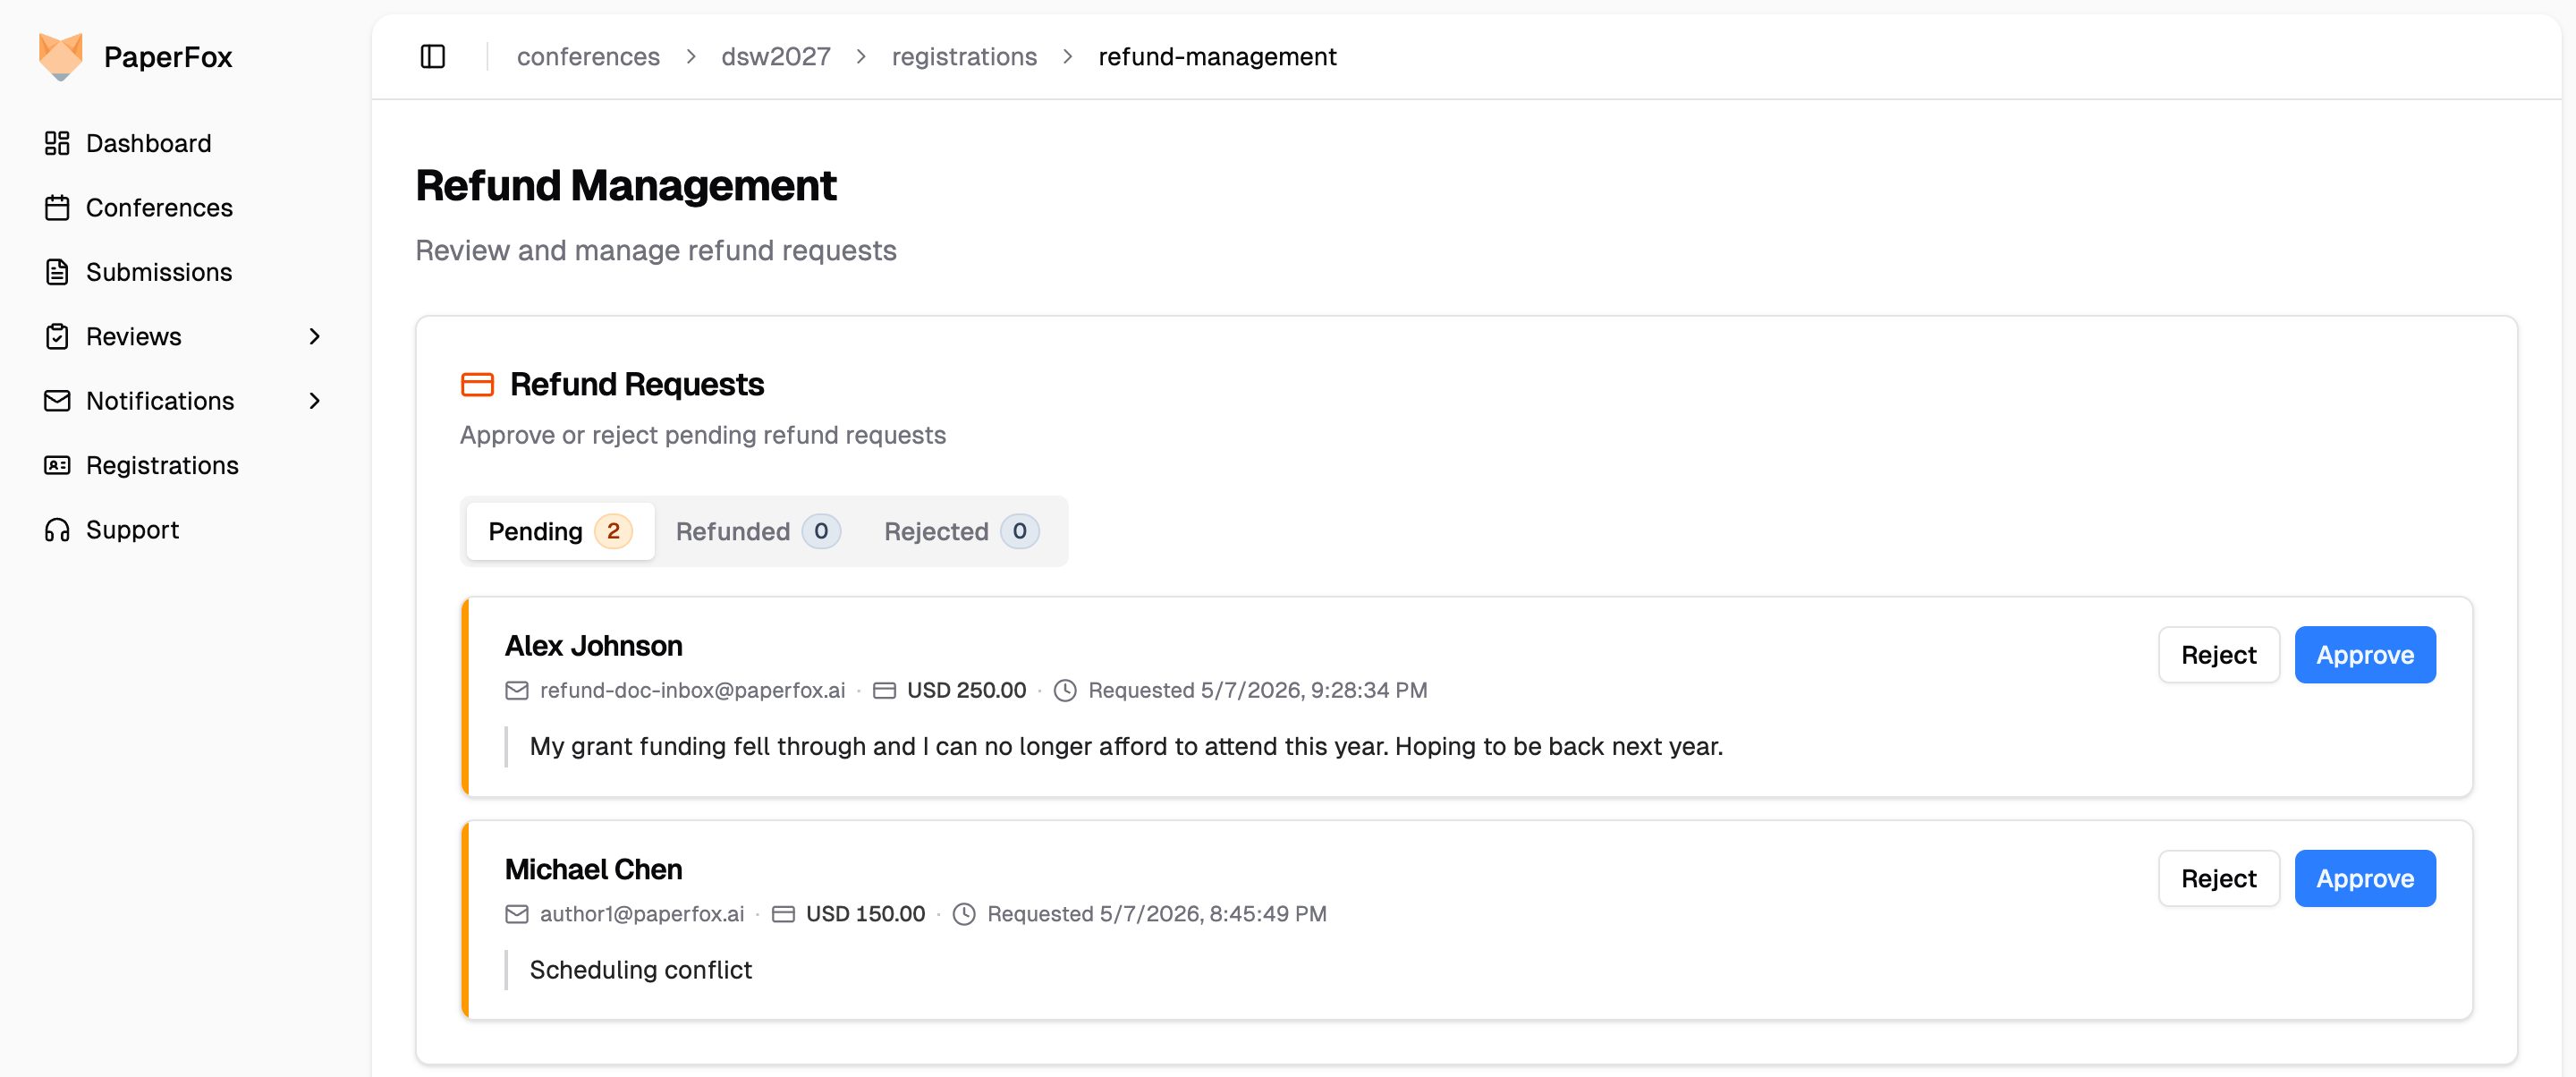
Each pending request appears as a card with an amber accent strip on the left edge. The registrant's reason is shown verbatim. Approved refunds switch to an emerald strip with a tinted footer summarizing the verdict; rejected ones get a rose strip.
-
Find the refund request and click "Approve"
-
Review the breakdown — the administrative fee is sourced from your refund policy
-
Click "Approve Refund" to process
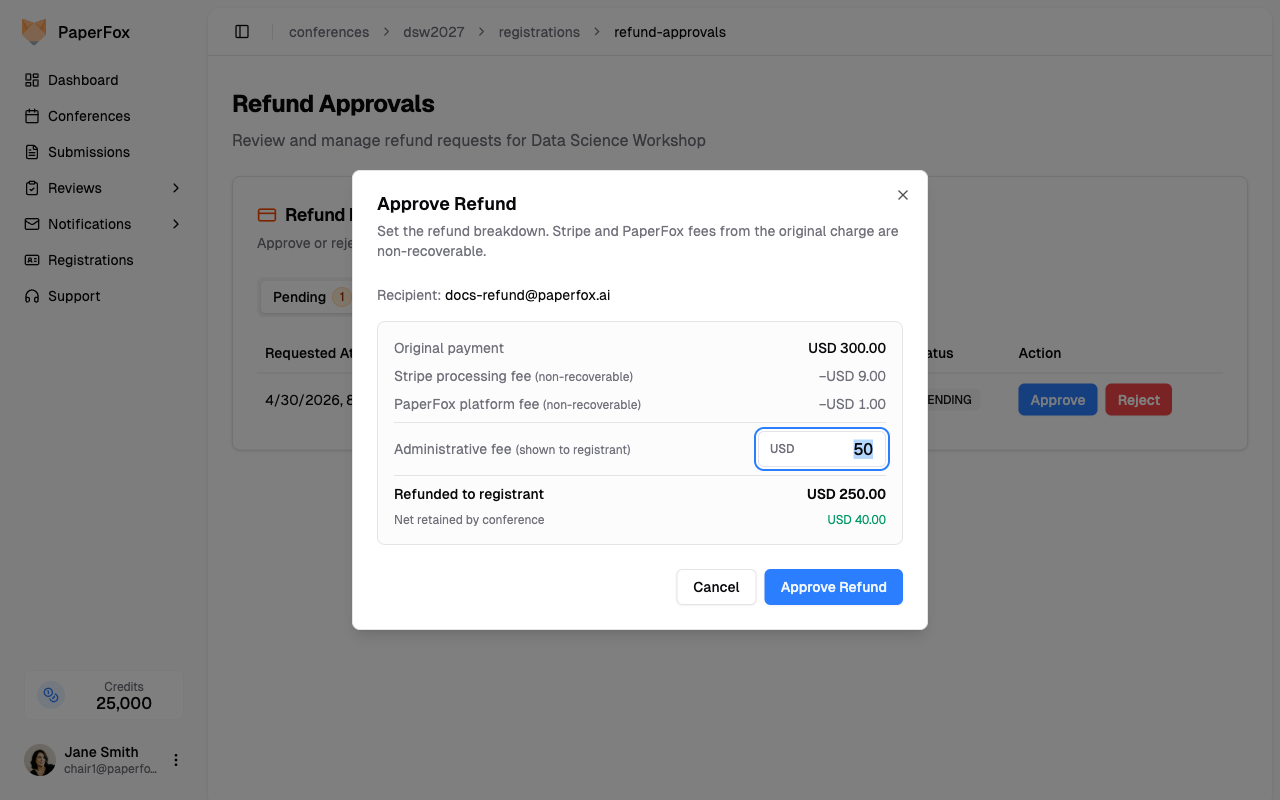
The dialog shows you the full economics of the refund:
| Line | Meaning |
|---|---|
| Original payment | What the registrant paid |
| Stripe processing fee | Stripe's 2.9% + $0.30 — Stripe keeps this on partial refunds |
| PaperFox platform fee | The $1 PaperFox fee from the original charge |
| Administrative fee | From your refund policy — registrant saw this when requesting |
| Refunded to registrant | Original payment minus the admin fee |
| Net retained by conference | What you actually keep after Stripe and PaperFox fees |
The registrant receives the refund automatically and gets an email showing the breakdown plus a link to their Stripe receipt — the same charge receipt they received at purchase, now updated to reflect the refund.
Administrative Fee
The administrative fee is a flat amount deducted from every refund, set once on the Registration Types page. It's shown to the registrant in the refund-request dialog before they submit — so the chair and registrant agree on the number up front, and the chair doesn't decide it per-case.
To change the policy, go to Registration Types and edit the Refund Policy card. See Refund Policy for the setup walkthrough. The fee can be set anywhere from $0 to $10,000.
The fee can't exceed the ticket price
A refund can't be approved if the admin fee meets or exceeds what the registrant paid. If you try, the approval dialog blocks it and tells you the fee is greater than or equal to the original payment — lower it on the Registration Types page first, then approve. Because the fee is a single flat amount, set it below your cheapest paid registration type so it applies cleanly to every refund.
Example: $300 ticket with a $50 admin-fee policy
Original payment:                      $300.00
Stripe processing fee (kept by Stripe): −$9.00
PaperFox platform fee (kept):           −$1.00
Administrative fee (you keep):         −$50.00
Refunded to registrant:                $250.00

Net retained by conference:             $40.00
The registrant sees $300 paid → $50 admin fee → $250 refunded in their refund-request dialog and on their refund statement.
Pick your refund policy deliberately
The conference always loses $10 (Stripe + PaperFox fees) on every refund, regardless of admin fee. With a $0 policy, "Net retained" goes negative on every approval. Either accept that loss as a cost of issuing refunds, or set a policy fee that covers it. Changing the policy applies to every refund approved from that point on, including pending requests submitted under the old policy — so avoid raising it after registrants have already submitted their refund requests.
What Happens During Refund Approval
When you approve, PaperFox checks your Stripe balance:
| Your Stripe Balance | What Happens |
|---|---|
| Sufficient funds | Refund processes instantly from your balance |
| Insufficient funds | Stripe debits your bank account (takes 5-7 days) |
You'll see a warning before approving if your balance is insufficient.
Example: Refund with Insufficient Balance
Scenario: You have $50 in Stripe balance, need to refund $250

1. You approve the refund in PaperFox
2. Stripe uses your $50 balance
3. Stripe debits $200 from your bank account
4. Registrant receives the full $250 refund
5. Bank debit takes 5-7 business days
Fees on Refunded Registrations
When you refund a registrant, the original transaction fees are not returned. This is standard across the payments industry.
| Fee | Per $300 refund | Returned? |
|---|---|---|
| Stripe payment processing (2.9% + $0.30) | $9.00 | No — Stripe keeps it |
| PaperFox platform fee | $1.00 | No — PaperFox keeps it |
| Total non-recoverable cost | $10.00 | — |
This matches published Stripe policy:
"The payment processing, Connect and currency conversion fees from the original transaction are not returned." — Stripe pricing (also Stripe refunds docs)
What the Registrant Sees
The refund-approved email itemizes the original payment, your admin fee, and the refunded amount. The View Receipt CTA opens their Stripe-hosted charge receipt — the same document they received at purchase, automatically updated to show the partial refund. Internal Stripe and PaperFox fees stay between you and your payment processor.
For expense reimbursement, registrants submit the original receipt (now showing the refund) plus the conference's email confirming the admin-fee deduction.
Issuing Invoices for Registrants
Most registrants use their registration confirmation email and the linked Stripe receipt as proof of payment — that's sufficient for expense reimbursement in most cases.
Some finance departments (especially in VAT jurisdictions like the EU and UK, and some corporate accounts-payable systems) require a formal invoice with your conference's legal business name and tax ID. PaperFox doesn't issue these automatically because the exact content depends on your conference's business setup and tax jurisdiction — your conference is the seller of record, not PaperFox.
When a registrant requests an invoice
Option 1: Create an invoice from your Stripe Dashboard (~2 minutes per invoice)
- Go to Registration Management → Payments & Payouts and click "Stripe Dashboard"
- Under Payments, find the registrant's charge
- Click Create invoice and link it to the existing charge
- Fill in the registrant's billing details (name, address, tax ID if needed) and submit
- Stripe generates a PDF invoice with your business info and emails it to the registrant
This is the simplest path and produces a Stripe-hosted invoice + PDF that finance departments accept. Stripe's own walkthrough is at Create an invoice from the Dashboard.
To make the institution name and tax/VAT number appear in the invoice header, add them to the registrant as a customer tax ID — Stripe documents this at Customer Tax IDs (a customer's tax ID displays in the header of the invoice PDF).
Option 2: Issue an invoice using your institution's template
If you prefer to use your university or conference's own invoice template, generate it manually using the data from the registrant's Stripe receipt:
- Invoice number (your own sequence)
- Issue date, conference name + dates, registration item, amount
- Your conference's legal entity name, address, and tax ID
- Reference to the Stripe receipt number as proof of payment
Keep your Stripe business profile complete
Whether or not you end up issuing manual invoices, keep your Stripe Connect business profile up to date. Update these via Registration Management → Payments & Payouts → Stripe Dashboard:
- Legal business name
- Billing address
- Tax ID (VAT, EIN, GST — whichever applies to your jurisdiction)
Two benefits:
- Receipts show the correct business name — finance departments reconcile payments against a legal entity, so seeing your conference's real business name (not a personal name or placeholder) reduces back-and-forth.
- Manual invoices are faster to create — when you use Option 1 above to issue an invoice from Stripe Dashboard, these fields auto-populate the Bill-From section, so each invoice takes about 2 minutes instead of filling in business info every time.
Profile fields don't turn receipts into invoices
Filling in tax ID and address affects the formal invoice (the Download-invoice PDF), not the simpler charge receipt. If a finance department specifically requires an invoice document (common for VAT jurisdictions), you still need to create one from your Stripe Dashboard.
Why doesn't PaperFox do this automatically?
For registration payments, your conference is the merchant of record — not PaperFox. Stripe generates invoices on your Connect account using your business details, so the invoice content depends on what you've configured. Auto-issuing invoices when that info is incomplete would produce legally-incomplete documents in some jurisdictions, which is worse than no invoice.
Need Help?
If you encounter issues during setup:
- Verification failed: Ensure your ID photo is clear and matches the name you entered
- Bank connection failed: Try entering account details manually instead of using instant verification
- Account restricted: Check the Stripe Dashboard for specific requirements
For additional support, use the Help Desk (available with paid support packages) or visit our Community Forum.